Implementation
Hardware
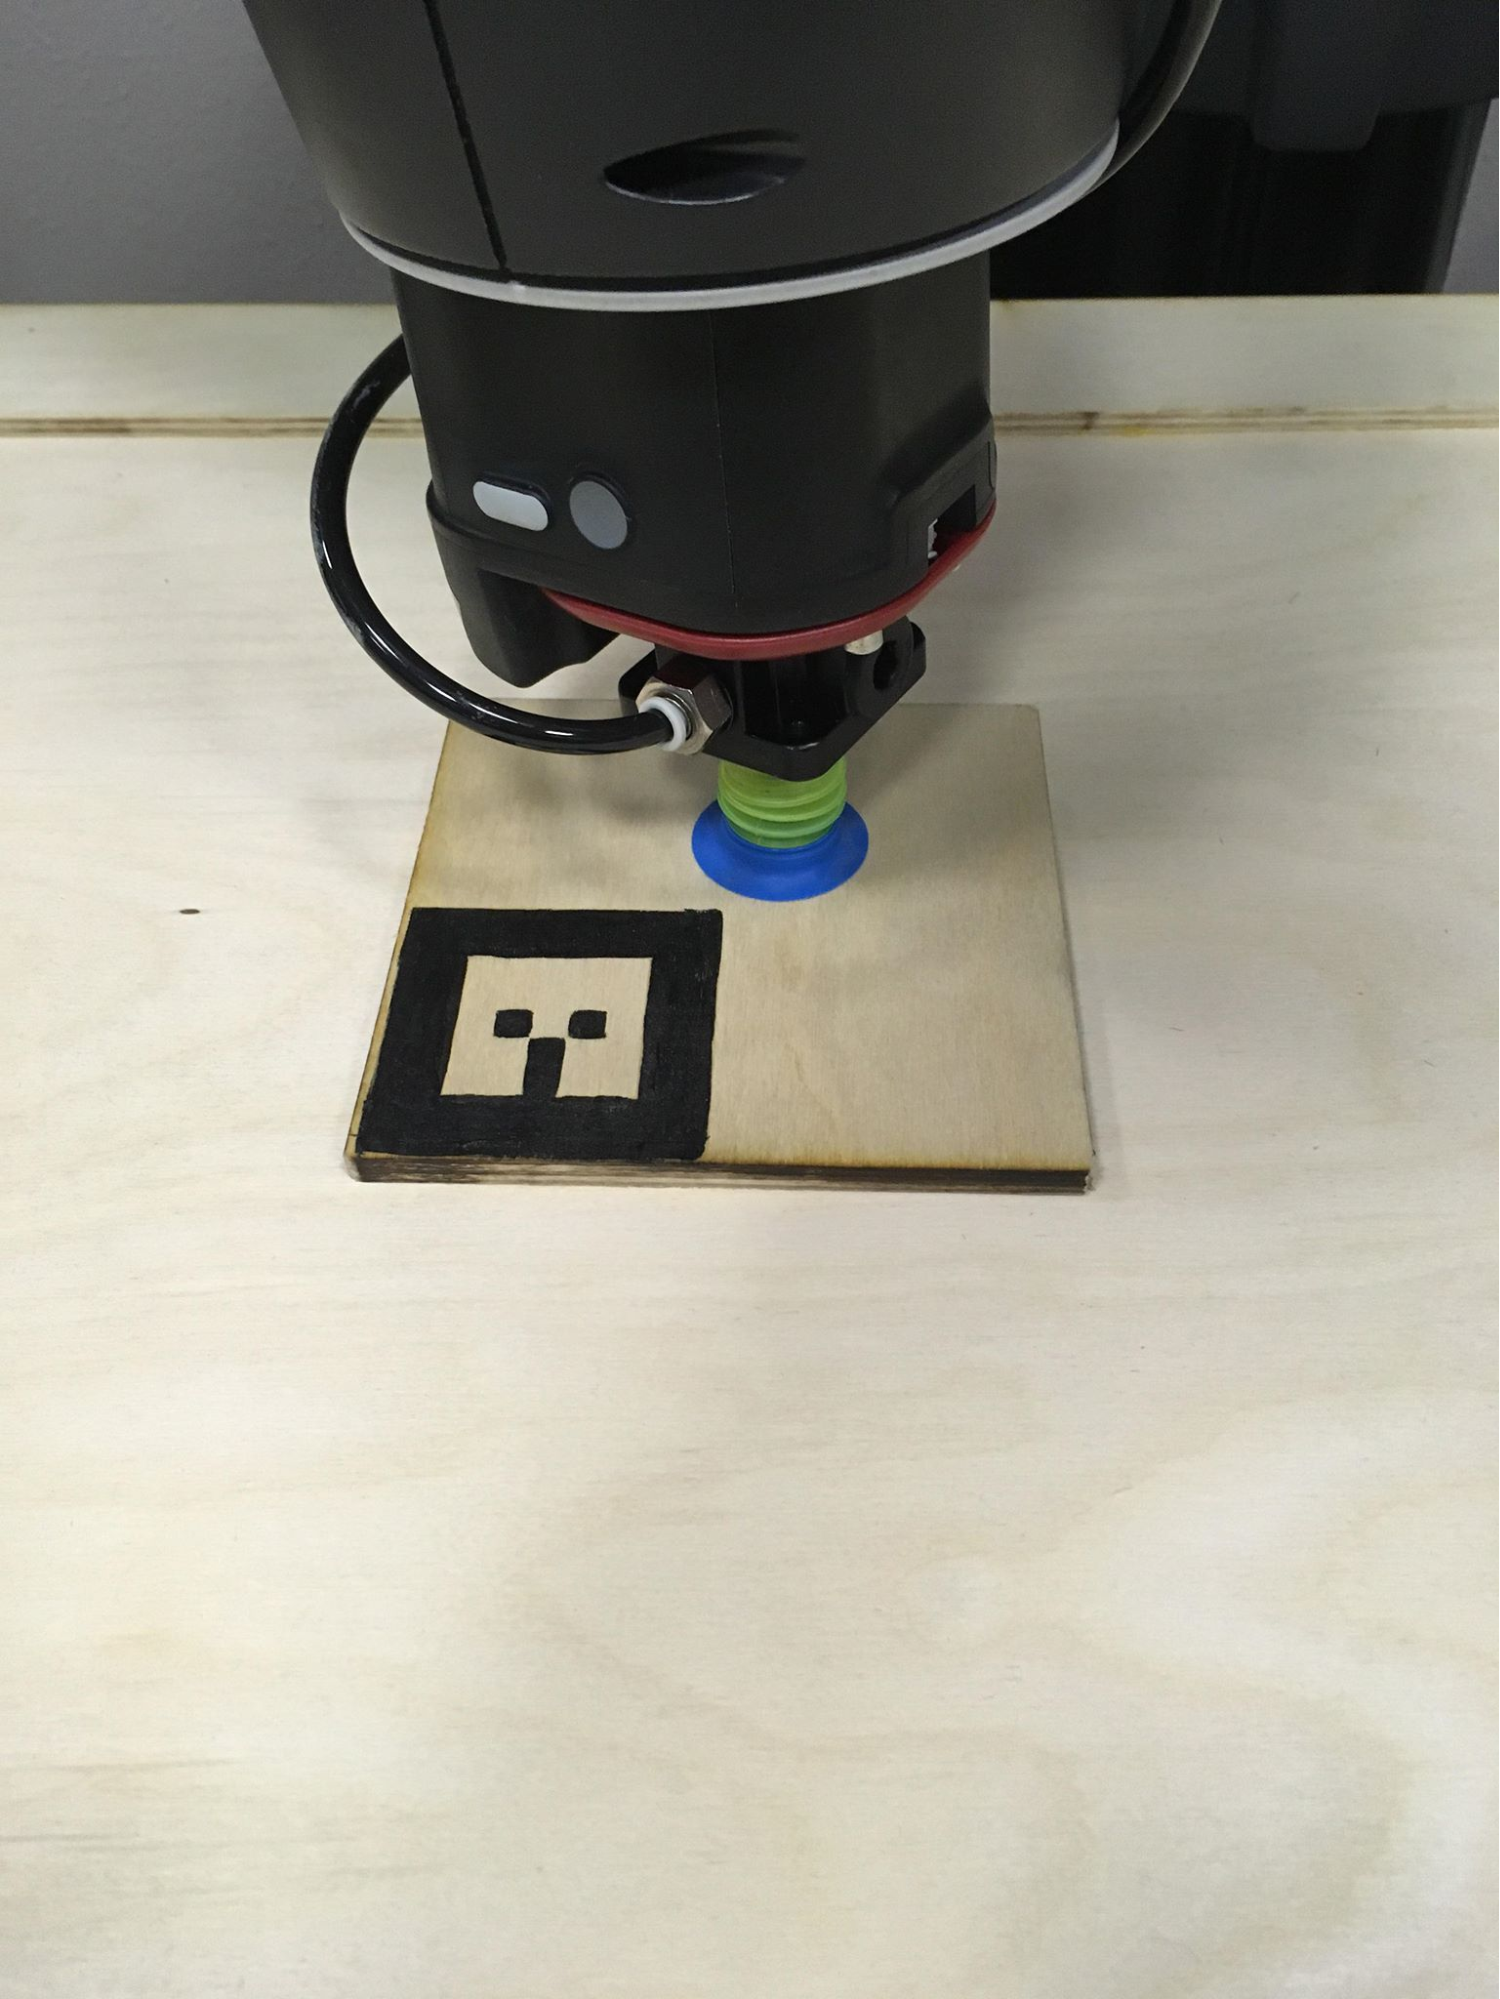
We place a table in front of a Baxter robot, as shown below. The board and tiles rest on the table.

Software
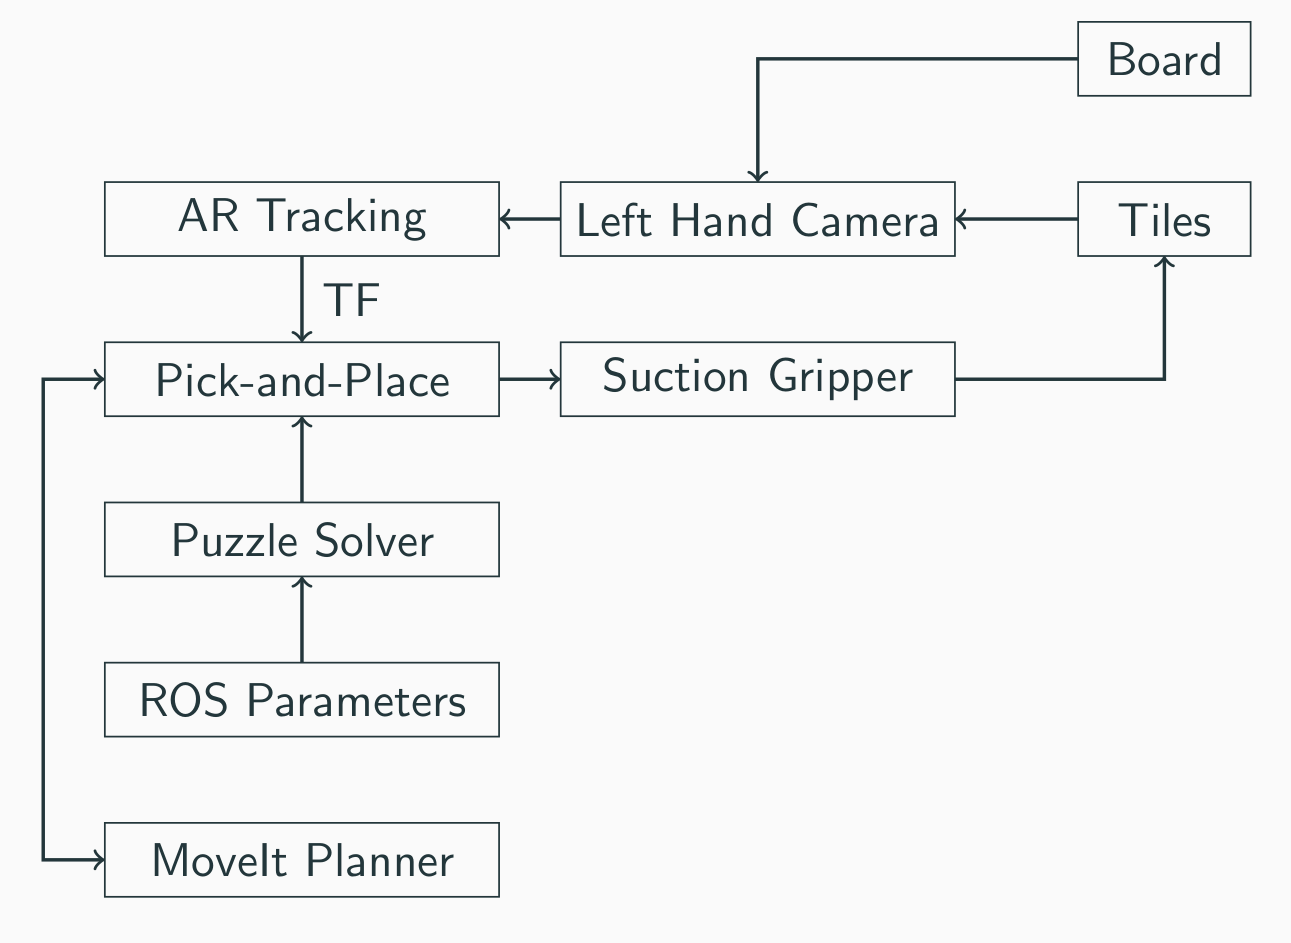
The system diagram above summarizes the main software components.
We used MoveIt for path planning, ar_track_alvar for tracking AR tags, and a pick-and-place module for coordinating the two.
Fabrication of parts
We used laser cutters in the makerspace at Jacobs Institute for Design Innovation to cut our own Tetris pieces and a board to place them from 1/4-inch thick plywood. The Tetris pieces are so-called because each piece is some union of 4 square blocks. Each square block is 2.5 x 2.5 inches (~6 x 6 cm) and the board can fit 6 x 8 of these blocks. We refer to the 7 unique pieces as the Square, Line, S, Z, Reverse-L, T, and L pieces.
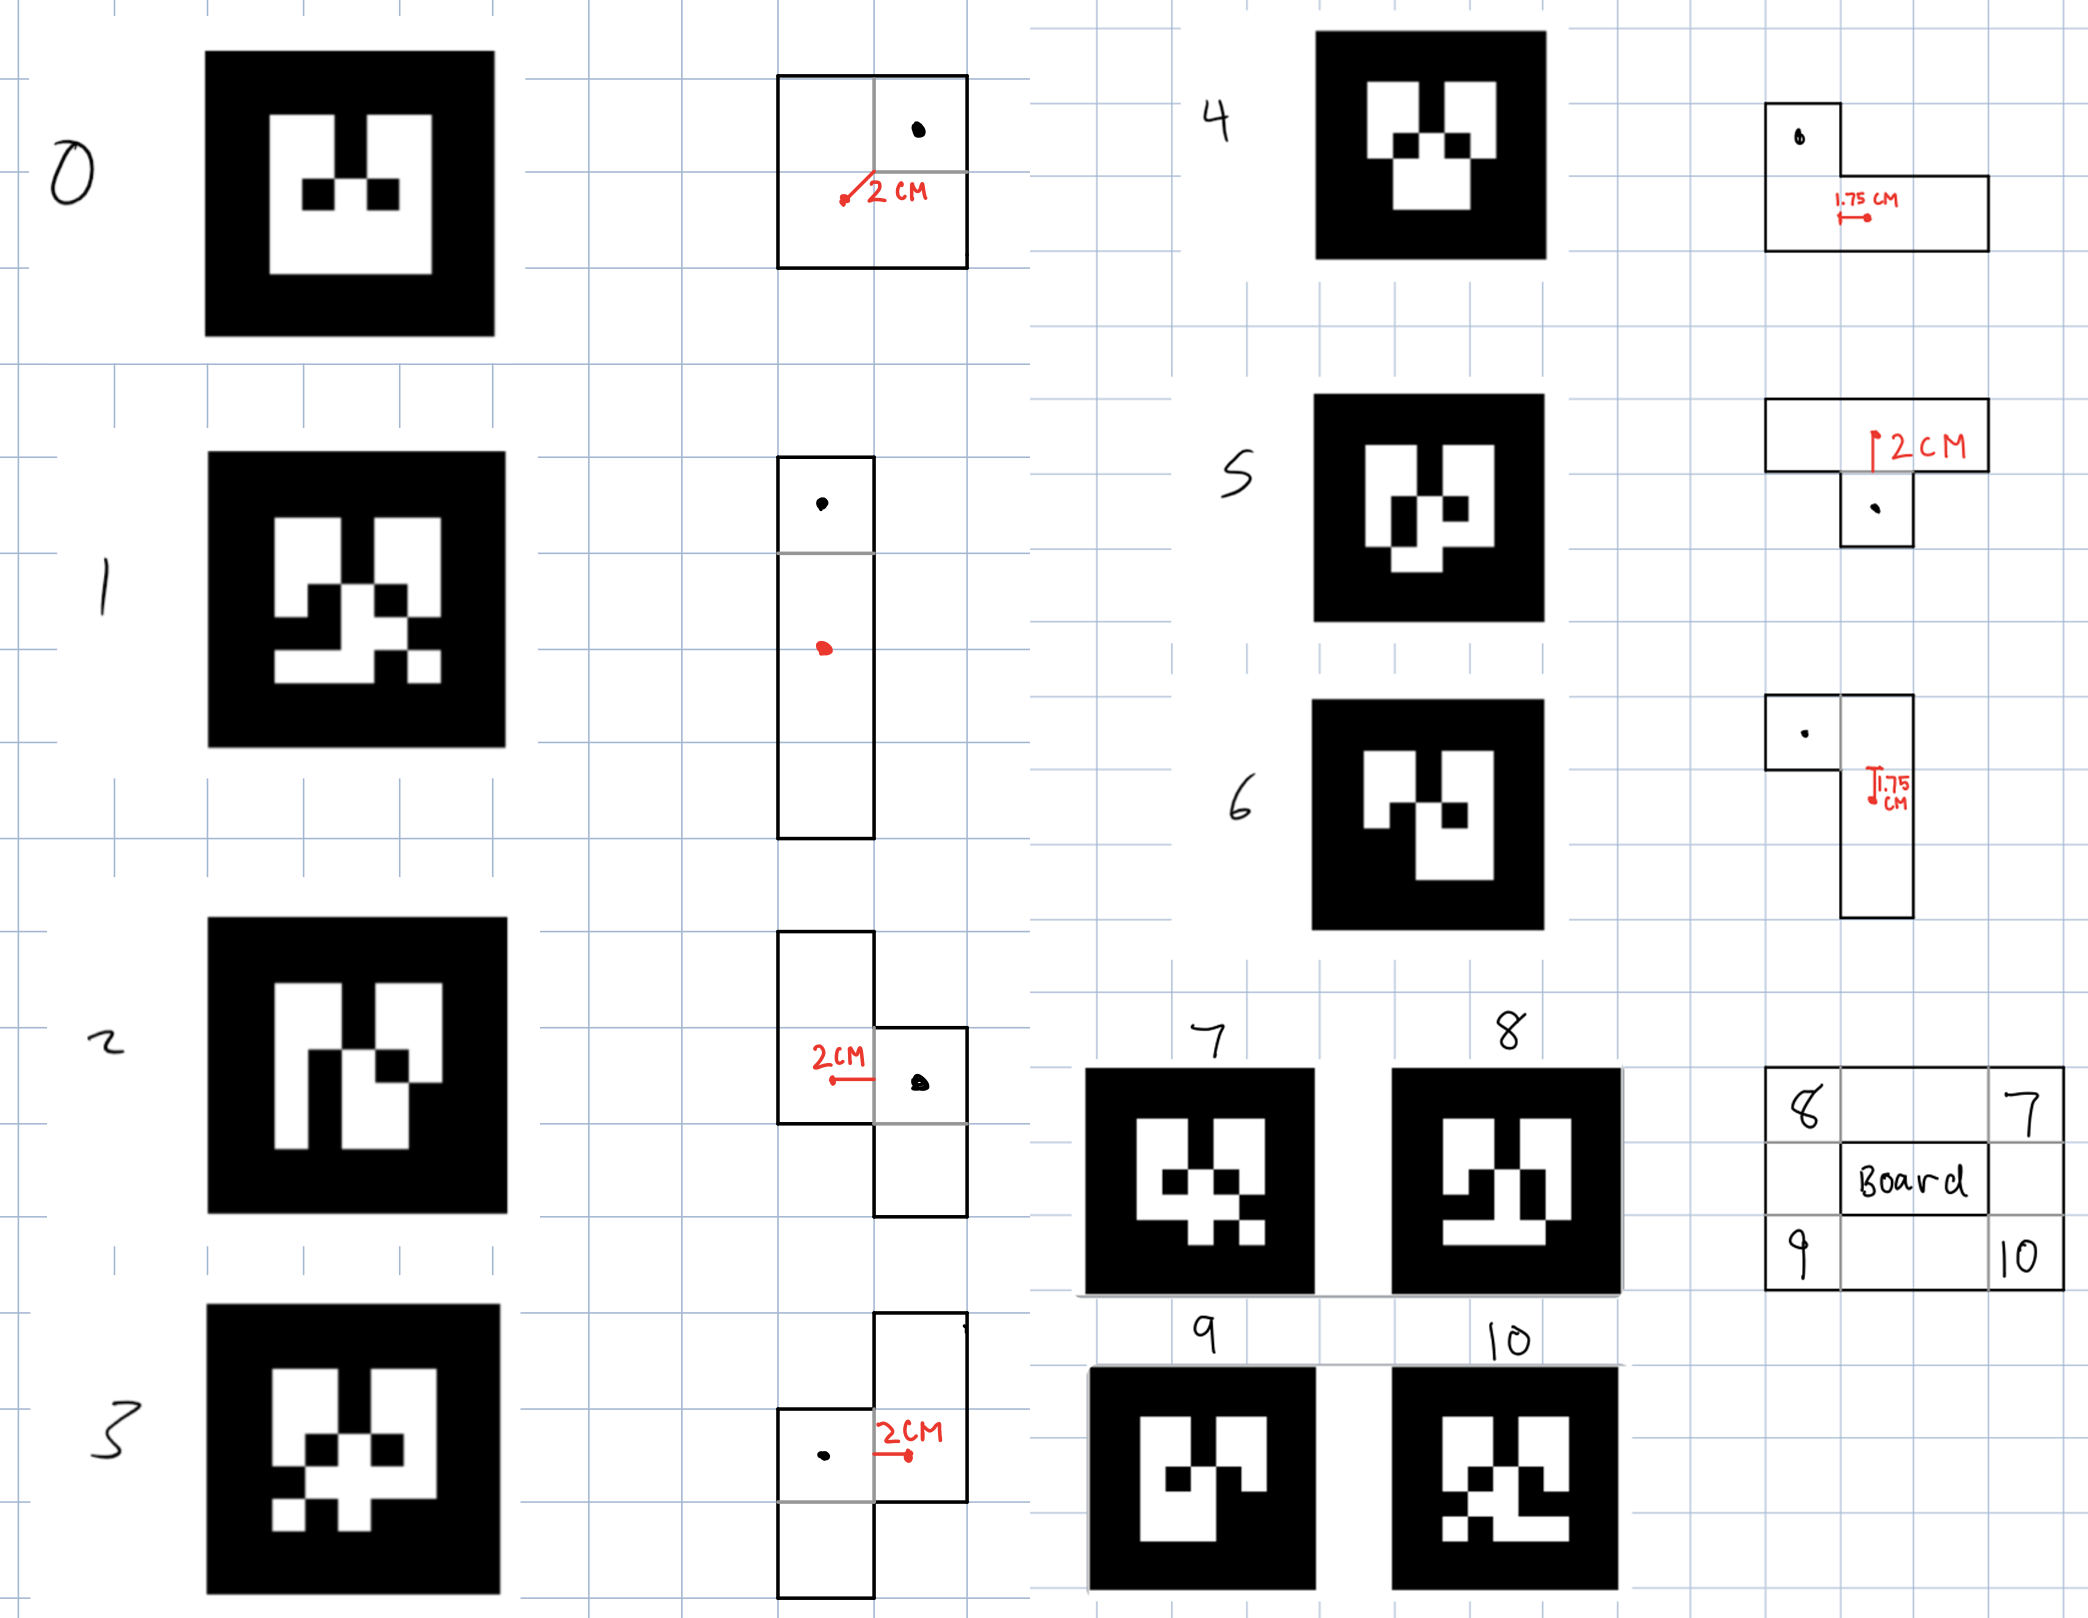
The picture above shows each piece and which AR marker is rasterized onto it and where (black dot), as well as where we tell our pick-and-place code to pick up the piece (red dot) using a suction gripper. We want this red dot to be as close to the center of mass of the piece as possible, which we can generally locate using the symmetry of the pieces. This is desirable for stability of the piece during pick-and-place, allowing for easier placement since it’s a tight fit on the board.
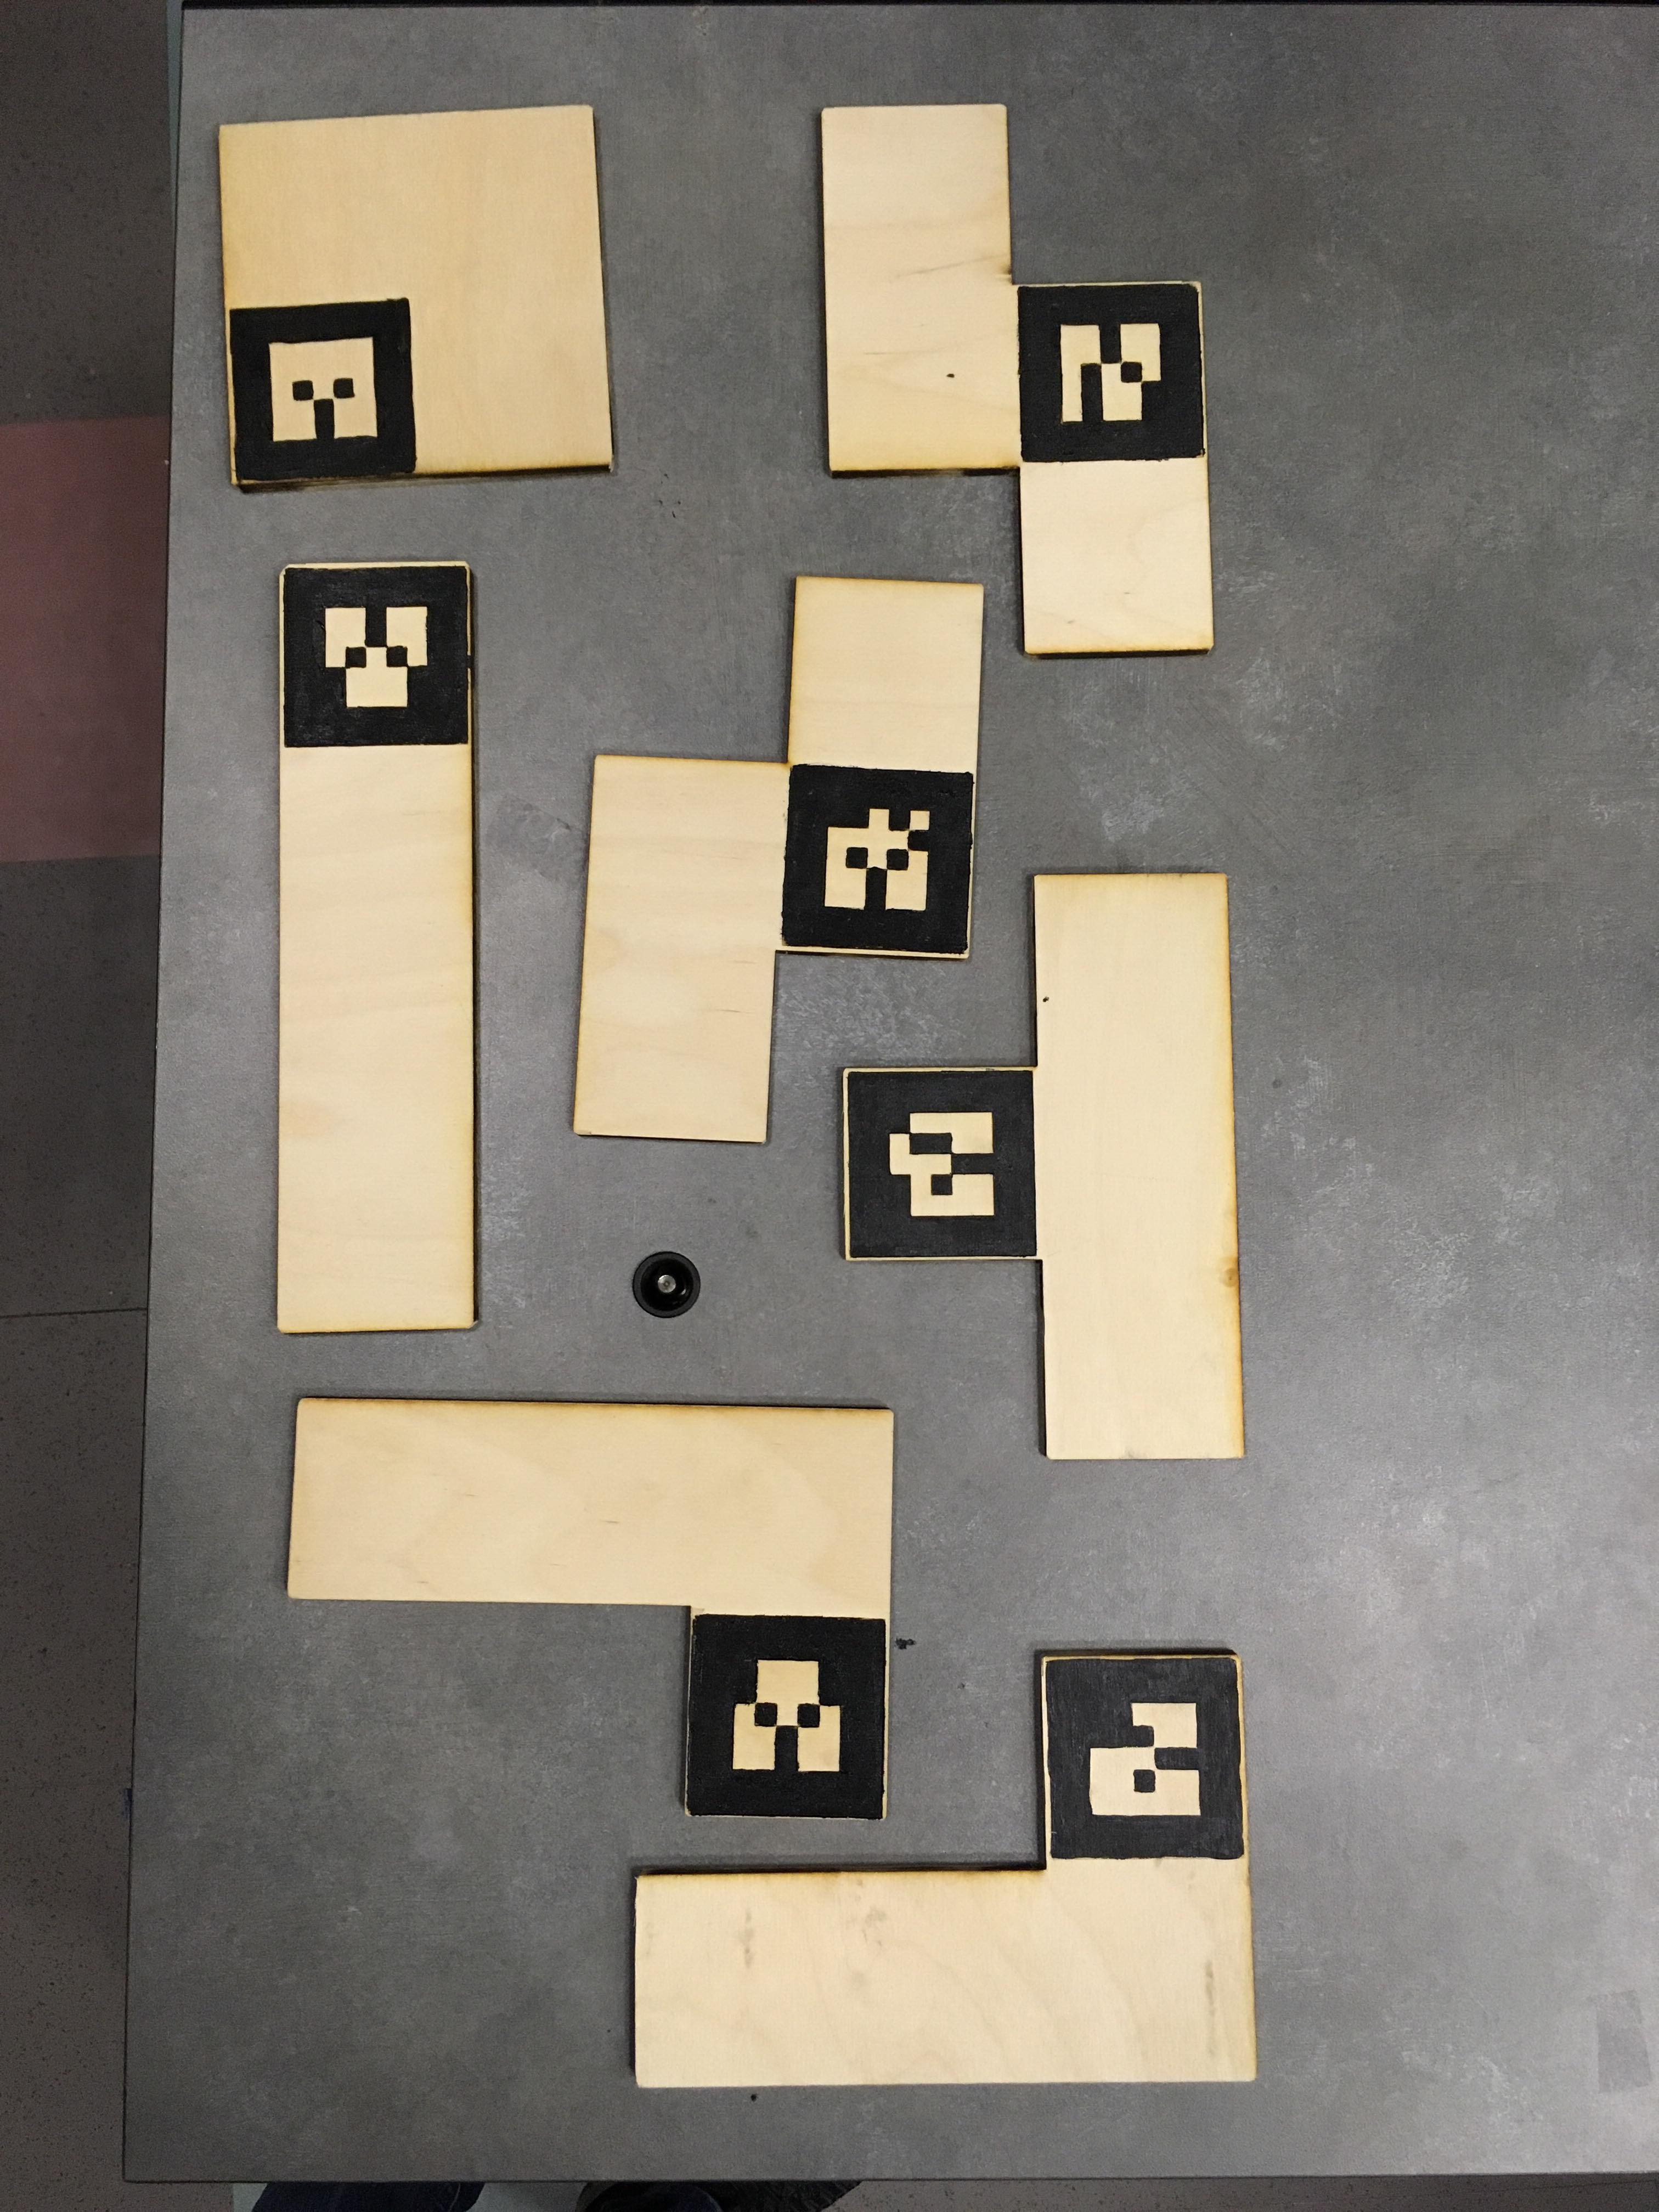
A full suite of real tiles is shown below, after the depressions were painted with black paint:
However, since the rasterized AR marker is an uneven surface, it was hard for the suction gripper to get a good seal if it was overlapping the AR marker. Therefore, we had to place the red dots such that the suction gripper (diameter 3.5 cm) would not overlap with the AR marker when it grips the piece, while still gripping close to the piece’s center of mass.
Task implementation
1) Figure out which Tetris pieces it’s working with and compute a Tetris solution
We input the 7 types of pieces along with how many of each we’re using and the size of the board (in block units) into a Tetris solver which outputs a complete board solution.
We define each piece as an instance of a Tile object. We specify its shape using a matrix of 0’s and 1’s. Each piece also contains information about its AR marker ID, its name, the number of unique rotations for the piece, and the offset from the center of the AR marker on the piece to the red dot (as drawn above) in meters.
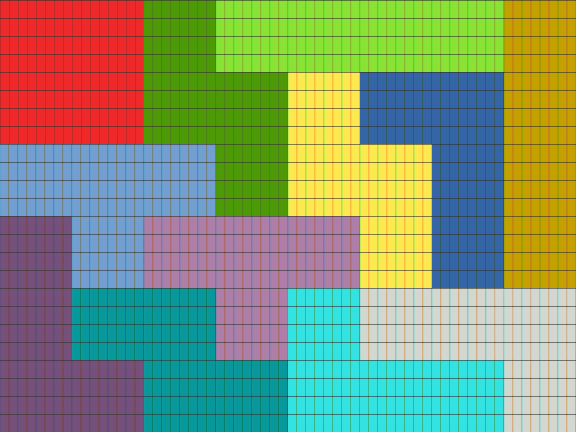
The solver itself uses a brute-force recursive implementation (originally designed by Caleb Begly of MIT) that greedily attempts to fill empty slots on the board using all rotations of each piece. A visualization of a sample solution to a 6x8 board is shown below.
2) From the solution, choose a piece to execute pick-and-place
We have the solver output the location of the AR marker for each piece in the solved puzzle in row-major order. We also want pick-and-place to execute in row major order so that we can more easily enforce a tight fit on the board (i.e. rather than first placing a piece in the middle of the board, instead place a piece that belongs in one of the corners and align it with the board frame).
The terminal will prompt the user for the next tile that should be placed on the table. Once this is done, Baxter will tuck its right arm to the side and move its left arm over the table to predetermined poses, looking for both the board and tile AR tags. If both are found, Baxter proceeds to (3), and places a box obstacle representing the table to the planning scene, if one does not already exist. This planner is aware of this obstacle, so this reduces the odds of a collision while working for tables of different heights.
3) Pick up the chosen piece at its red dot
We first have Baxter locate the piece’s AR marker. From the dimensions of the piece and the red dot offsets, we can compute the location of the red dot in the AR marker’s frame. Note that since the AR marker’s frame also specifies an orientation with respect to the base, the red dot coordinates also include an orientation. This means that the gripper will always pick up a given piece in the same orientation and position.
We then use tf2 to transform the red dot coordinates to Baxter’s base frame and direct the right gripper to plan a path to that pose (position + orientation) that doesn’t hit the table (which is added as a box obstacle manually). We then execute the plan and activate the vacuum gripper.
To ensure that we have picked up the piece, we first have the gripper go to a position we know is safely above the red dot (i.e. above the height of the table). We tell the vacuum gripper to start suction and check whether it has grasped anything. This is done by querying the analog sensor on the vacuum gripper, and if the value is above a certain threshold (we use 47), that indicates that the gripper has achieved a successful seal and has grasped the piece. Else, we stop suction and lower the gripper slightly and try again until we have grasped the piece. We then lift the gripper above the plane of the table and board.
4) Finally, move the piece to its solution place on board and drop it off
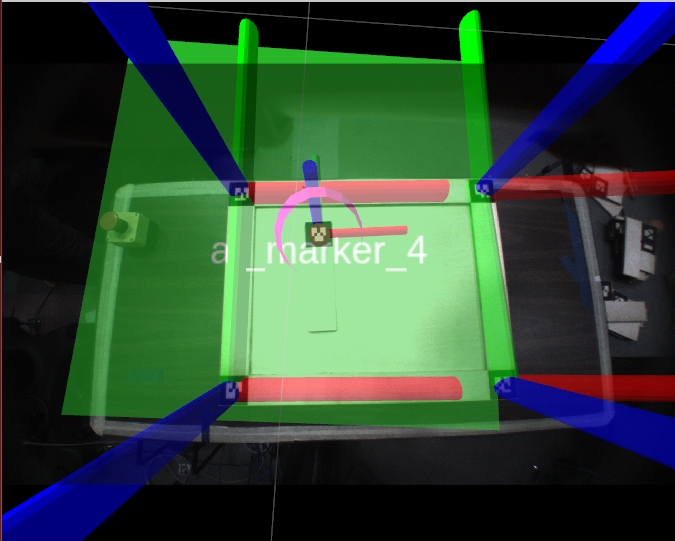
We find the location of the top left corner of the board using an AR marker bundle. This bundle specifies that the 4 AR markers on the board are attached to a single rigid body. Detecting any of the 4 markers should give us the location of the “master” marker (i.e. the top left marker on the board). The ar_track_alvar package has a node findMarkerBundles that takes in an XML file specifying the bundle and publishes the master marker transform.
We have the left-hand camera do a sweep over the board to maximize its chances of detecting one of the bundle markers and thus locating the top left corner of the board. From the solution computed in step 1, we know where the piece needs to go with respect to the board using the dimensions of pieces, the final rotation of the piece, and red dot offsets. We then transform this pose to the Baxter’s base frame, then plan and execute a path there for the gripper.
We first move the gripper to location safely above the board and then slowly lower it to the height of the board (table height + 1/4 inch board thickness). We finally release the suction gripper, dropping the piece into place.
5) Repeat from step 2 until all pieces in solution have been placed